
Change Outlook signature - this is how!
Change Microsoft Outlook Signature - explained quickly and easily!
How to change the Outlook signature? In the past, when all letters were still sent in paper form, the so-called farewell formula could not be missing under any circumstances. Something like „Best regards“ or „Yours sincerely“ and a personal signature was a must. But who actually says that this should no longer be the case in e-mail correspondence today? If you work with Microsoft Outlook, for example in Windows 11 or Windows 11 Home, you can easily create an Outlook signature and change it at any time.
Do I have to create an Outlook signature?
That depends on whether you are writing a purely private or a business e-mail. In the business sector, a signature has been mandatory for e-mails since 2007. This means that for self-employed persons, freelancers or companies, as soon as they send an invoice or an offer by e-mail, the same information as in an imprint must be included as sender information. These minimum details are mandatory:
- Name of the company
- full name of the owner
- address for service
Fortunately, this can be done almost in a flash with Microsoft Outlook 2021. And a great company logo, a ready-made signature or even a portrait of the sender can also be integrated quite easily when you want to create the Outlook signature.
And this is how it’s done
For example, in the Microsoft Outlook 2019 Multilanguage full version with the Windows 11 Pro or Windows 11 Pro N operating system, signatures can be automatically attached to all outgoing mails. It is also possible to add a signature to individual e-mails. If you want to change an Outlook signature, proceed in the same way:
- First open a new e-mail message.
- Select the option „Signature“ in the “ Message “ menu.
- Under „Signature to edit“, select the option „New“.
- In the „New Signature“ dialogue box, give the signature a name.
- Use „Edit signature“ to write the personal farewell formula. The font, font size, text alignment and colour can be easily specified. If you want to change the Outlook signature later, each individual point can also be edited later.
- Using the option „Select default signature“ in the drop-down menu „E-mail account“, first select the corresponding account to which the signature is to be assigned.
Tip: Each e-mail account in Outlook, for example in Windows 11 Education, can be given its own individual signature. The more individual and specific these are, the more personally the recipients feel addressed. In a business context, this can have a more professional effect.
- If all messages are to receive the signature, select one of the signatures in the drop-down menu „New messages“ .
- If you do not want all new messages to automatically receive a signature, simply click (none)
- If the signature is also to be shown on reply mails or forwards, select an appropriate signature under „Replies/Forwards“.
- If this is not necessary, select the standard option ( none).

Add signature manually one by one
If you have decided not to automatically add a signature to every e-mail, you can still add a signature, address, picture, etc. to individual e-mails afterwards. Select an individual e-mail and choose the „Signature“ option on the „Message“ tab. In the flyout menu, each signature created can now be selected to be displayed under the individual message.
Add picture, logo and signature
With Microsoft Outlook, a signature with pictures can also be created or the Outlook signature can be changed accordingly under Windows 11 Enterprise and Windows 11 Pro for Workstation.
- To do this, select Signature> Signatures in a new e-mail.
- In the field „Select signature for editing„, click on the signature that is to be provided with a logo, a picture or with the digitised signature (as a picture).
- Now select a corresponding image file on the PC with the icon Image and connect it to the signature by clicking on „Insert“.
- Right-click on the image under the „Size“ tab to adjust the area of the image.
Tip: If the checkbox „Lock aspect ratio“ is activated, the image ratios are preserved.
Header image: ©monticellllo, stock.adobe.com

Draw shapes in OneNote - this is how!
Drawing shapes in OneNote - explained quickly and easily
How to draw shapes? OneNote, for example, in Microsoft Office 2021 Standard on Windows 11, is considered one of the best tools when it comes to making quick notes, records or sketches. For better illustration and overview, a circle or a triangle, for example, can be drawn in different ways – with the Surface Pen or freehand in OneNote. We show here how this works in the Microsoft 365 Family programme, for example, in the Windows 11 Home operating system.
Draw shapes easily with the graphics tablet
With a special graphics tablet or a tablet PC with the Windows 11 Pro or Windows 11 Pro N operating system, in which Microsoft Office 365 Home is installed, for example, you can freehand draw whatever comes to mind in OneNote. Simply draw a rectangle, circle or triangle with the Surface Pen next to, below or in the middle of the notes. Handwritten notes, stick figures or anything else you like can also be drawn on the screen just like on normal paper.
Just draw a rectangle with your finger? Of course!
If you don’t have a special pen for drawing at hand, you can also simply put your shapes and notes „on paper“ with your finger or the mouse.
- To do this, first select the option „Draw with mouse or finger“ in the „Draw“ menu.
- In the same menu, the thickness of the pen can be selected.
- With the option „Freehand colour“ you can determine the colour of the drawing.
- Now you can draw on the touch screen with your finger or on any other PC with the mouse cursor.
If you don’t like it, simply delete it
Anyone can miss a line. No problem in OneNote, mistakes or unattractive drawings can be easily erased:
- Tap on „Eraser“ and choose one of the following options:
- „Medium eraser“ manually erases certain parts of the drawing.
- „Brush stroke eraser“ erases entire drawing gestures, i.e. sections of the drawing, with one tap.
Drawing shapes more neatly with the defaults
Of course, anything freehanded into shape with the Surface Pen in OneNote looks suitably wild. Especially if you want to show your notes or individual sections to others, you can draw neater shapes with the presets in the programme under Windows 11 Education or Windows 11 Enterprise in Microsoft Office 2021 Home and Business, among others. To do this, simply call up the „Shapes“ function. The menu then shows predefined geometric figures. Simply select the appropriate one and place it in the right place on the page in One Note. To do this, click with the cursor on the place where you want to draw a circle or a rectangle, for example. Then select the corresponding shape by holding down the left mouse button and it appears in the previously selected place. With the markings that appear around the shape, you can now draw everything larger or smaller. Moving the shapes and, of course, deleting them are also child’s play.
All in one with „Freehand in Shape
One of the most practical functions of OneNote in Microsoft 365 Business Premium, for example, under Windows 11 Pro for Workstation is „Freehand in Shape“. It is located on the Draw tab. A click on the button switches on automatic shape recognition.
- So first the function at the top of the menu is switched on.
- Now draw the desired shapes with the Surface Pen as usual.
- OneNote recognises the shape on its own and automatically converts it with clean, even edges.
- At the end, simply deactivate „Freehand in shape“ again in the menu.
Tip: Right next to the function „Freehand in shape“ you will find the option „Freehand in text“. The selection automatically converts handwritten text passages into more legible print.
Header image: ©monticellllo, stock.adobe.com

Crop PowerPoint image - this is how to do it!
Crop PowerPoint image - explained quickly and easily
Anyone who works with Microsoft Office 2021 Standard or Microsoft Office 365 Home under one of the Windows 11 operating systems, for example, will sooner or later also use the PowerPoint presentation programme. There are a few tricks and turns that make working with it much easier. For example, you can easily crop a PowerPoint image to highlight certain PowerPoint image sections. Our instructions show how this works.
Why do you have to crop a PowerPoint image?
You don’t have to – but you can! And that’s exactly the big advantage that Microsoft Office 2021 Home and Business, Microsoft 365 Business Premium and Microsoft 365 Family offer. After all, it is usually the case that in both the business and private spheres, you don’t necessarily want or need to see everything that can be seen on an image that you want to present. Or it is important to draw attention to only a single section of the picture. The possibility of highlighting image sections and cropping images with PowerPoint 2021, for example, is therefore ideal. After all, a presentation with images lives through appealing motifs, impressive image details and surprising shapes. This underlines the message of a text and arouses the viewer’s curiosity. If you can crop a digital photo and highlight it as a PowerPoint image section, you can greatly enhance your presentation on a PC with Windows 11 Pro or Windows 11 Pro N operating system.
Cropping images – this is how it works
You do not need a special programme to crop a PowerPoint image. With the tool under Windows 11 Education or Windows 11 Enterprise itself, you can easily crop a photo in just a few steps:
- Under tab „Insert→ Images“, first insert the motif at the appropriate place on the slide.
- Leave the picture activated and then go to the „Picture tools“ tab
- Now click on “ Crop“ in the “ Size “ group
- Now the photo can be cropped – to a specific shape or according to a desired aspect ratio.
- The marked section in the picture can now be enlarged, reduced or moved to the desired size with the help of the crop marks.
- When everything is as desired, you only have to click next to the shape so that PowerPoint saves the changes.
The whole process can be undone with the Image format → Reset image → Reset image and size tab.
Crop more than one PowerPoint image at a time
Sometimes it is practical to be able to crop not just one, but several images at the same time with PowerPoint under Windows 11 Pro for Workstation, for example. For example, when two images are placed next to each other on the slide but are too large or too small. Then simply hold down the CTRL key and drag the side crop marker inwards or outwards accordingly. If you want to crop all four sides of the PowerPoint images, you again hold down the CTRL key and then drag one of the crop marks at a corner accordingly.
The special shape creates atmosphere
If pictures are always displayed in a rectangular or square shape, they can become a bit boring. However, you can create a special atmosphere if you not only crop PowerPoint pictures, but also give them an unusual form of presentation.
- To do this, select an image and click on the upper half of the “ Crop“ button in the „ Image format“ tab
- Select „Crop toshape
- Select the appropriate shape such as an ellipse, a circle, a hexagon or similar. The photo now automatically appears with the outline of the selected shape.
- Then click on the upper half of the „Crop“ button to make the crop marks appear.
- Now adjust the size and proportion of the shape.
- Within the shape, the image can be moved to find the right crop.
- A mouse click outside the marks saves the picture in its chosen shape.
- The result can be undone with the keyboard command „Ctrl + Z“.
Header image: ©vladim_ka, stock.adobe.com

Microsoft Office - How to improve your privacy
Microsoft Office - how to improve your privacy
Private users, but above all employees in companies, must pay attention to data protection and protect their privacy when working with Microsoft Office 2019 Home and Student or Home & Business or Microsoft Office 2019 Professional. The company itself provides several options precisely for this purpose. So anyone who wants to buy a new Microsoft Office is well advised to follow these tips.
Buying Microsoft Office - these versions are available
The various Microsoft Office 365 options are subscription-only systems. The situation is different with Microsoft Office 2019. Here, the different packages are offered for one-time purchase.
These features are included in the versions:
Microsoft Office 2019 Home and Student is the slimmest version of all. It includes only the basic applications Word for word processing and text layout, Excel for spreadsheets and calculations, and PowerPoint for presentations. Microsoft Office 2019 Home & Business is suitable for private users as well as for small businesses and self-employed persons. In addition to the basic applications, this package also has Outlook, the organiser for the office, which can be used to create emails that can be organised immediately with the integrated calendar, for example for meetings or appointments. Microsoft Office 2019 Professional is – as the name suggests – intended for professional use in companies. Among other things, this version convinces with two additional features: Publisher is the layout software with which publications such as flyers, brochures, invitations, catalogues and the like can be professionally created. Access makes it possible to create and manage database applications. The databases can be created as apps for the PC or as applications for the browser and can be easily made accessible to others after completion.
Protecting data in Microsoft Office 2019
PC applications must be secure and not make it easy for outside access. Protecting data and securing privacy is therefore the top priority! Microsoft provides both local setting options and group policies for precisely this purpose, with which the settings for security are executed locally. The first thing to do is to check the cloud connection. If, for example, sensitive data is stored in OneDrive, data protection can quickly be violated. The check takes place under the menu item „Account“ in the „File“ tab. Here you can see which user account a user uses and for which cloud storage links exist. In addition, the policies control which security settings should apply to Microsoft Office 2019. Attention: Office 2016 often appears as the current version in the settings. This note can be ignored, as Microsoft Office 2019 contains the exact same configurations. The settings for this are made via
- Computer Configuration
- Policies
- Administrative Templates and User Configuration
- Policies
- Administrative templates
- Microsoft Office 2016
- Security settings
For more privacy and data protection settings, see [/vc_column_text ]
- User Configuration
- Policies
- Administrative Templates and User Configuration
- Policies
- Administrative templates
- Microsoft Office 2016
- Privacy
- Trust Center
- User configuration
- Policies
- Administrative Templates
- Microsoft Outlook 2016
- Security
- Trust Center
The Security / Restrict automatic picture download settings determine how Outlook should proceed when downloading pictures from the Internet.
Think about the macros for protection too!
Especially for networks, macros (chain of commands in an application programme) are a danger that should not be underestimated. The reason: Office programmes execute actions via an external code. This creates the possibility that data can be viewed or even stolen by unauthorised persons. The Trust Centre offers configuration options that determine how Office should react. Everything about this can be found under the menu item Macro Settings. If macros do not have a signature, they are blocked by Office programmes. For group policies, the settings for this are to be made with the following steps:
- User configuration
- Policies
- Administrative Templates
- Microsoft Office 2016
Attention: Separate settings should be made for each Office application.
Privacy settings in the Trust Center
The Trust Center is accessed via the Filetab and the Options menu item . Under Settings for the Trust Center you will find the menu item Privacy Options. Here you can make further settings for data protection that apply to all Office programmes. These include, among other things, the selection of diagnostic data that is transmitted to Microsoft or individual settings for the account as well as the local installation of Microsoft Office 2019. Tip: The document check can be used to determine whether data is hidden in a document that is not intended for the recipient.
Counteract viruses
If you want to buy a new Microsoft Office, you should also think about attacks on your data and privacy from the outside. As best virus protection for Windows is Microsoft Defender Antivirus. The programme scores with comprehensive real-time protection against viruses, malware and spyware in e-mails, apps, the cloud and downloads from the Internet.
Header image: ©MicroOne, stock.adobe.com

Windows 10 über (CMD) aktivieren
Windows 10 über (CMD) aktivieren
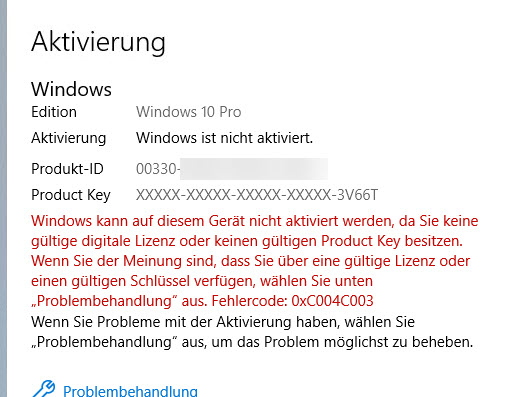
Es kann mal vorkommen, dass Windows sich nicht über die Oberfläche aktivieren lässt.
Ohne Windows 10-Aktivierungstools von Drittanbietern können Sie Windows 10 mit CMD kostenlos aktivieren.
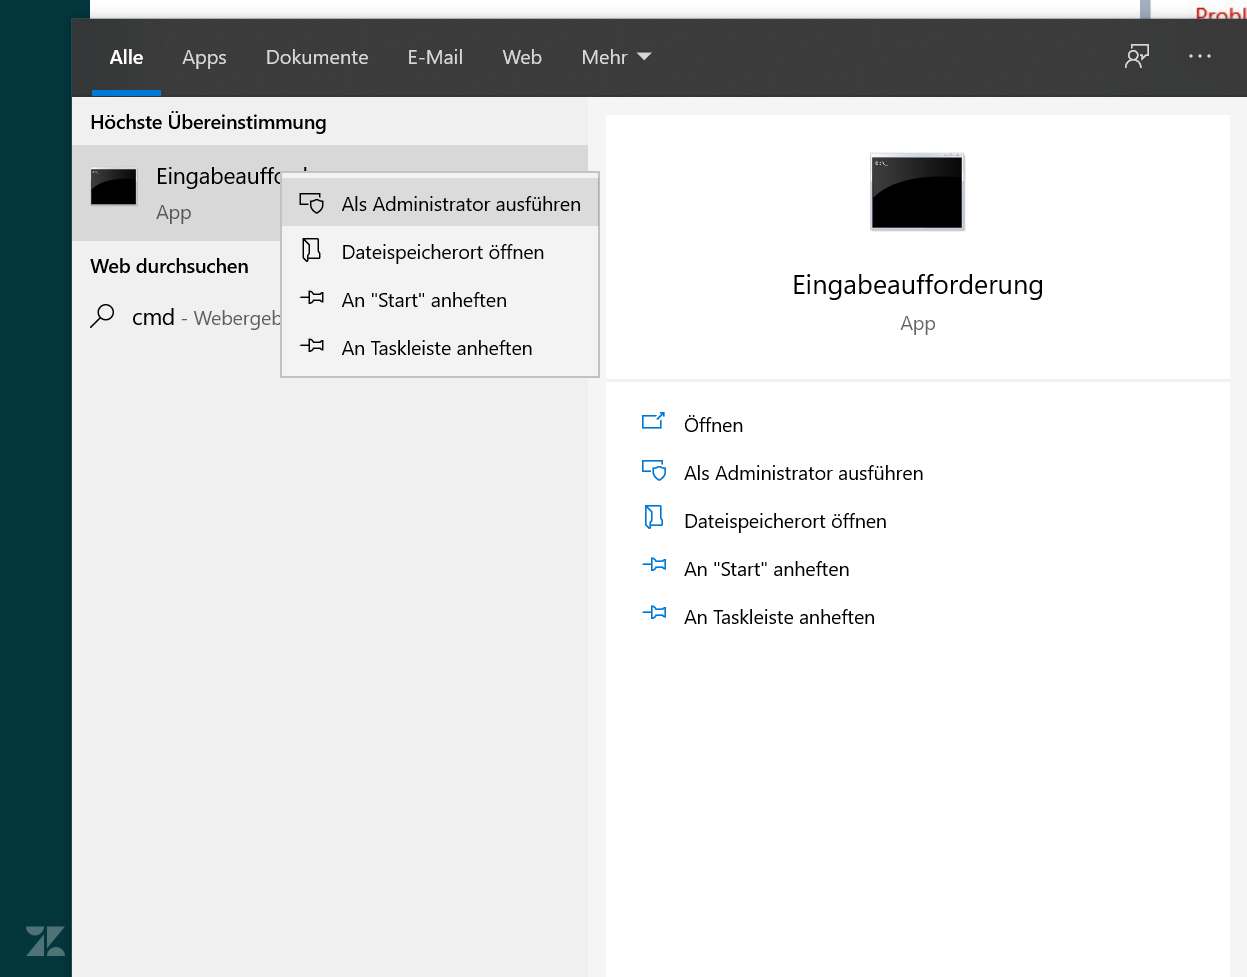
Ihr könnt unter Windows 10 die Eingabeaufforderung in zwei Varianten öffnen: Mit Administratorrechten oder als Nutzer mit eingeschränkten Rechten. Manche in der Kommandozeile durchgeführte Aktionen erfordern erweiterte Rechte. In solchen Fällen könnt ihr die Windows 10 Eingabeaufforderung dann gezielt als Administrator starten.
1. Starten Sie die Eingabeaufforderung als Administrator (rechtsklick):
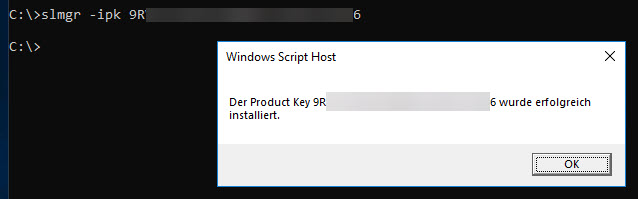
2. Folgenden Code in das Fenster schreiben: slmgr -ipk XXXXX-XXXXX-XXXXX-XXXXX-XXXXX (Statt XXXX, bitte den Produktschlüssel eingeben)
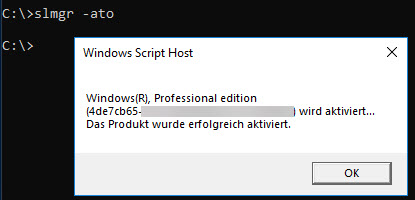
3. Anschließend muss der Key aktiviert werden. Schreiben Sie folgende Zeilen in die Eingabeaufforderung: slmgr -ato
Was ist neu in dem Neuen Update von Windows 10? Diese Frage beantworten wir Ihnen gerne unter diesen Link hier
Windows 10 installieren – Infos zu Versionen und Installation
Windows 10 installieren – Infos zu Versionen und Installation
Obwohl Microsoft im Januar 2020 den Support von Windows 7 eingestellt hat, haben längst noch nicht alle Windows Nutzer das neueste Betriebssystem Windows 10 aufgespielt.
Einen Monat nach dem Supportende nutzten noch etwa ein Viertel aller Computer weltweit Windows 7 als Betriebssystem. Dieses Windows 7 statt dem neuen Windows 10 zu nutzen, ist für jeden Nutzer ein nicht zu unterschätzendes Sicherheitsrisiko.
Dabei ist es einfach, den eigenen Computer mit einem Windows 10 Upgrade auf den neuesten Stand zu bringen. Bis vor einigen Monaten konnten Windows Nutzer Windows 10 kostenlos herunterladen. Dieses Angebot von Windows ist mittlerweile ausgelaufen – jetzt muss man Windows 10 kaufen, um den Lizenzschlüssel zu bekommen.
Es gibt dabei verschiedene Möglichkeiten, um Windows 10 zu installieren. Windows 10 als Download kann wie ein Update installiert werden. Alternativ kann eine Windows 10 Iso-Datei heruntergeladen werden und die Installation von dieser erfolgen. Welche Variante für Sie die richtige ist, stellen wir in diesem Blogartikel vor.
Windows 10 als Update
Besonders einfach ist die Installation von Windows 10 als Update für Windows 7 und Windows 8.1 Nutzer. Mit diesen beiden Betriebssystemen lässt sich das Windows 10 Upgrade fast wie ein normales Update installieren.
Wer sich für diese Variante entscheidet, bekommt automatisch von Windows angeboten, die entsprechende Windows 10 Version zu installieren. Dabei gibt es bei den Upgrades Unterschiede. Je nach installierter Version erhält man eine entsprechende Windows 10 Version. Diese kann man der folgenden Tabelle entnehmen:
Das Installationsprogramm übernimmt nach der Eingabe des Windows 10 Keys die Installation fast komplett selbständig und behält die meisten Systemeinstellungen, Passwörter, Lesezeichen, Präferenzen und bereits installierte Programme sollten auch nach dem Update weiterhin funktionieren.
Bei dieser Variante muss der Windows 7 oder 8.1 Nutzer auf das kleine Symbol für das Windows 10 Update in seiner Taskleiste klicken. Anschließend beginnt der Computer mit dem Windows 10 Download automatisch. Die Installation von Windows 10 erfolgt dann fast komplett automatisch, nur den Windows 10 Key muss der Benutzer eingeben und einige Präferenzen bei der Installation.
Obwohl diese Form der Installation von Windows 10 erfahrungsgemäß völlig problemlos abläuft, ist es trotzdem Ratsam vor dem Upgrade die eignen Dateien, wie Dokumente, Fotos und Musik auf einem externen Datenträger zu sichern.
Das System mit Windows 10 neu aufsetzen
Wer sein altes System nicht so weit wie möglich beibehalten möchte, kann auch das System neu aufsetzen.
Vor der Installation sollten wieder alle wichtigen Dateien gesichert werden!
Nach dem Windows 10 Update können Nutzer dann über die Systemeinstellungen im Untermenü „Update und Sicherheit“ den Punkt „Recovery“ und „PC“ auswählen. Hier lässt sich eine komplette Neuinstallation des Systems vornehmen.
Alternativ kann das System auch manuell gelöscht werden und das neue Betriebssystem mit einer Windows 10 Iso-Datei installiert werden. Hierfür muss die Datei bei Microsoft mit dem Media Creation Tool heruntergeladen werden.
Diese Windows 10 Iso-Datei muss anschließend auf einem externen Datenträger installiert werden, über den die Installation abläuft, nachdem das System gelöscht wurde. Dieser Weg eignet sich auch, um Windows 10 auf einem PC zu installieren, über den der Windows 10 Download nicht erfolgte.
Windows 10 als zweites Betriebssystem auf einem Computer
Wer sein altes Betriebssystem behalten will, kann Windows 10 kaufen und auch als zweites Betriebssystem installieren. So kann beispielsweise die alte Windows 7 Installation weiterhin offline genutzt werden, während Windows 10 für alle online Aufgaben dient.
Anwender, die noch oft auf ältere Programme zurückgreifen müssen, die nicht mit Windows 10 kompatibel sind, sollten sich für diese Variante entscheiden.
Hierfür muss zunächst eine zweite Festplatten-Partition für Windows 10 erstellt werden. Bei Windows 7 geht dies über die Datenträgerverwaltung. Für Windows 10 muss das Format „NTFS“ für die neue Partition genutzt werden!
Für diese Installation muss Windows 10 über das Media Creation Tool heruntergeladen werden. Hier wird die Option „Installationsmedium für anderen PC erstellen“ gewählt. Die Installation auf einer anderen Partition als Laufwerk C: funktioniert am besten über eine Windows 10 Iso, die über einen externen Datenträger installiert wird.
Beim Setup der Installation muss die Option „Benutzerdefiniert“ ausgewählt werden, damit der Installationspfad selbst ausgewählt werden kann. Sonst würde Windows 10 sich automatisch auf Laufwerk C: installieren.
Folgende Windows 10 Versionen sind bei uns erhältlich:
- Windows 10 Home kaufen
- Windows 10 Pro kaufen
- Windows 10 Enterprise kaufen
- Windows 10 Enterprise LTSB 2015 kaufen
- Windows 10 Enterprise LTSB 2016 kaufen
- Windows 10 Enterprise LTSC 2019 kaufen
- Windows 10 Education kaufen
Header-Bild: © rvlsoft, stock.adobe.com